Wireshark in IP version 6 workshop was a part of IPv6 summit sessions of Troopers 16. It was held by Jeffery Carrell on the second day of IPv6 summit on Tuesday, the 15th of March. The workshop was generally divided into two sections: a short introduction to IPv6 and analyzing some IPv6 packets on Wireshark.
Introduction to IPv6
IPv6 protocol was defined at the end of 1990’s, mainly to provide a huge address pool after realizing that the world would run out of IPv4 addresses quickly. The work on IPv6 started before the introduction of NAT and Private addressing to IPv4, which are considered temporary solutions of IPv4 address shortage problem. IPv6 address consists of 128 bits, divided into 8 groups called nibbles, quibbles or hextets separated by colons. Each nibble consists of four hexadecimal digits. The 128 bits address length provides 340 trillion trillion trillion addresses. An IPv6 address is divided into two parts: the left part is the network identifier while the right one is the host identifier. The default prefix is /64 which divided the IP address into two halves. An IPv6 address looks as follows: 2001:0db8:1010:61ab:f005:ba11:00da:11a5/64
There are several types of IPv6 addresses: Unicast addresses, Multicasts and Anycast addresses. A Unicast address represents a single host, and each interface of the host can have more than one Unicast address. Hosts are usually assigned two types of IPv6 unicast addresses: Link local and global unicast addresses.
1- Link local address:
It resembles the private address in IPv4 world. It is used to communicate within the local network, whether with other hosts or with the on-net (local network) router. It is unroutable and cannot be reached from outside of the local network. Each interface should have only one link local address. Any Link local address has a network identifier of FE80::/10 but actually the host identifier starts after the 64th bit, as if the prefix is /64. As soon as IPv6 is enabled on an interface, it generates a link local address. There are three ways for an interface to get a link local address:
- Manually: Link local address configured manually at the host.
- Modified IEEE EUI-64 format (RFC 4291): the host ID is derived from the MAC address of the interface.
- Privacy format (RFC 4941): The host ID is generated from a random number.
After the interface generates its link local address, it sends a multicast message to all hosts in the local network to confirm that there is no other host with the same address. This process is called Duplicate Address Detection (DAD).
Neighbor Discovery protocol (NDP)
NDP is an IPv6 protocol defined in RFC 4861. It replaces ARP of IPv4 and enables the IPv6 interface to detect and communicate with on-link neighbors and router. NDP defines the following important ICMP messages:
- Neighbor Solicitation (NS): a host multicasts this messages to look for a link local address, or to confirm that its generated link local address is not assigned to another host (DAD). It has an ICMP type value of 135.
- Neighbor Advertisement (NA): a host replies to NS, it is similar to ARP response in IPv4. Its ICMP type is 136.
- Router Solicitation (RS): a host multicasts this message to discover the router in the local network. The ICMP type of RS messages is 133.
- Router Advertisement (RA): A router sends RA to identify itself to all hosts in the network and send network information to all hosts. ICMP type of RA is 134.
2- Global Unicast Address (GUA)
It acts as a public address in IPv4 world. It is routable and accessible from outside of the local network. It is rarely used in on-net communications. A host can have up to 6 different GUAs in the same network and almost infinite number of GUAs across different networks. A GUA has an address range from 2000::/3 until 3FFE::/3.
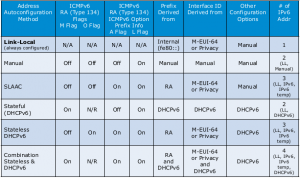
A global address can be obtained by any of the following address autoconfiguration methods:
- Manually: An IPv6 is manually assigned at the host.
- Stateless Address Auto configuration (SLAAC): The host gets the network prefix from the RA message, then creates two GUAs with two different host IDs. The speaker does not consider it a good method to assign addresses, because assigning more than one GUA results in confusion, whether in configuration or troubleshooting .
- Stateless DGHPv6: Same as SLAAC, but the host gets extra information from a DHCPv6 server, such as DNS and NTP.
- Stateful DHCPv6: RA does not contain the prefix, so the host sends a solicitation message to detect a DHCPv6 server to obtain a GUA and other configuration.
- Combination: host obtains addresses using SLAAC and stateful DHCPv6 methods, eventually the host ends up with too many IP addresses which is not desired.
RA message contains 4 flags that define the address autoconfiguration method, the flags are:
- M (Managed address configuration): If set, the host gets its IP address from DHCPv6 server.
- O (Other configuration): If set, the host gets other configuration (such as DNS) from DHCPv6 server.
- A (Autonomous address configuration): indicates whether autoconfiguration processing needs to be performed for the provided prefix.
- L (On-link): indicates if the addresses in that prefix can be reached on that link without going through a router.
These flags instruct the host on which of the above methods to follow in order to get its Global address. This following table shows the state of the four flags in case of each method:
Wireshark
The second part of the workshop introduced some useful tricks in Wireshark that help investigating IPv6 packets, but they are applicable to any protocol. Wireshark is a free and open source packet analyzer, which captures traffic and saves them in .pcap files. It also displays packets and analyzes almost any known protocol. It is a GUI tool that can display thousands of packets in the same window. The default Wireshark GUI consists of three main sections:
- Packet list: displays each packet in a single line and some identification parameters as columns such as destination IP address and protocol.
- Packet Details: displays the highlighted packet in deep details.
- Packet bytes: displays the raw bytes of the highlighted packet.
The display style highly aids users during troubleshooting and helps users to analyze packets a shorter time and with less mistakes. The following are useful tips to improve and customize the visual display of Wireshark packets.
Display filters
When a users is interested in a subset of the captured packets, he can show only the packets of interest by applying a display filter to the captured packets. There are several ways to apply a display filter:
- Write a filter expression in the filter bar. The expression can take the following forms:
- Protocol: ipv6
- Attribute==value: such as ipv6.src == fe80::f957:3844:95e5:9d17
- Complex: combining two or more expressions using and (&&) and or (||)
- The user can right click on any packet parameter, then choose “Apply as filter”, then Wireshark displays all packets with this parameter having the same value.
The user can save a filter by hitting the “Save” button next to the filter bar, in order to apply the filter in future without the bother of memorizing it.
Parameters as columns
During packet investigation, users usually are interested in specific parameters in each packet. therefore instead of going through each packet’s details and checking these parameters, Wireshark enables users to display these parameters as columns in the Packet list section. All the user needs to do is right click on a parameter in Packet details window and choose “Apply as Column” option. The speaker demonstrated how this option can be very useful in investigating Router Advertisement packets, by applying the four main flags M,O,L and A as columns.
Colors
Wireshark highlights packets of different protocols in different colors. The user can modify the color of a protocol through the “Coloring rule” menu. This menu is accessible from “Customize Colors” option in the View menu. The user can also create a new Coloring rule to set the color of a specific group of packets by hitting “New” and type the filter that defines this group of packets in the “String” field.
Profiles
Configuration profiles hold customized configurations such as the saved display filters and coloring schemes. Users can save different profiles using “Configuration Profiles” menu, accessible from “Edit” menu. The user can easily switch between profiles by clicking on “Profile” in the status bar.
Comments
During investigation, users might like to add specific comments to specific packets, to be used as a future reference or to share information with any user who opens the .pcap file. Comments can be easily added by right-clicking a packet and choose “Comment Packet” option. Any user can see the comments in the Packet details section.
Check out the slides from Jeff’s talk here!
Thanks,
Ahmad Abolhadid